The Macintosh Operating System has improved itself through the years and has done its best to make it easier for computer users to use their products. More features were added to help them utilize the maximum potential of the products they buy from apple. They have simplified many processes of the computer making users feel like professionals when using the product’s features. The whole product line of Mac had been worked on and improved through the years and has helped many users get to produce professional quality results from quality applications in the computer.
They have even made capturing screen shots on a Mac so simple and can be done in numerous ways, making it flexible by giving the users options on how to do things comfortably with their computer. Listed below is a summary of the top ten ways to take a screen shot on a Mac OS X.
10. Choose Timed Screen mode in Grab
Choosing the Timed Screen mode in Grab Applications shows an instruction window that allows the user to prepare the screen for capture. Once the user is ready, the user will then press the “start timer” button and will then receive a ten second window before the screen is captured. The mouse cursor will also be included in the user’s screen shot.
9. Choose Screen mode in Grab
The Screen mode in the Grab applications includes the mouse cursor in the screen shot. Choosing the Screen mode in Grab shows an instruction window asking the user to click the screen when he or she is ready to capture.
8. Choose the Window mode in Grab
Choosing this mode in the Grab application, an instruction window will appear requesting that the user select the window chosen for capture. Once the user selects the window for capture, the user will then click the “choose window” button. Once this button is clicked, the instructions will then disappear and the clicked window will be captured, including the mouse cursor at the position where the user clicked.
7. Choose the Selection mode in Grab

Once this mode is selected, the user can already capture a specific part or region of the screen by dragging around it. The Grab function will now display a tooltip showing the size of the part the user has selected and the screen shot will open in a window when the mouse button is released. The cursor will not be included in the screen capture.
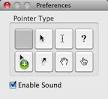
6. Using the bundled Apple Utility “Grab”

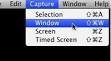
This tool is located in the Applications Utilities folder. It is useful only if you need to include a cursor or a menu on the user’s screen shot, or if it is needed for the file to be saved in TIFF Format. To include a cursor, go to Grab preferences and select the cursor icon preferred to have in the screen shot. To capture the screen using Grab, run Grab and then choose among the capture modes available from the Capture menu: Selection, Window, Screen, and Timed Screen.
5. Pressing Control combined with either #7 or #8

Adding the control button to the two shortcuts discussed earlier places the screen shot on the clipboard instead of saving the file on the desktop.
4. Pressing Command-Shift-4, then pressing the space bar

This command help the user capture a specific application window, making it easier to isolate the information needed from a screen shot as opposed to capturing the whole image. Using this command turns the cursor into a camera icon, which the user can move around the screen. As the user moves the icon toward an application window, the window will be highlighted and ready for capture. The entire window is no longer needed to be visible when chosen for screen capture. When the user already has the cursor over a window that is for screen capture, just a click from the mouse will automatically save the screen shot as a PNG File on the user’s desktop. It is good that the file saved can be immediately seen on the desktop because some users tend to forget they initially save their files and spend more time looking for the lost file.
3. Pressing Command-Control-Shift-3

The screen shot process using the Command-Control-Shift-3 command allows the user to have the opportunity to choose which program to use when saving the screen shot. This command also allows users to copy the entire desktop. When using this command, the screen shot will then be placed on the user’s clipboard, making it available for pasting or saving into another folder or program.
2. Pressing Command-Shift-4

Using this command also copies the entire desktop but also allows the user to be able to save the file automatically as a PNG File. Automatically saving these files have made quite a difference and makes it simpler for users to be able to track the files they have taken screen shots of. This command also makes a cross-hair cursor appear and allow the user to click and drag to select an area chosen for screen capture. When the mouse button is released, the screen shot will then be automatically saved as a PNG File on the user’s desktop. In earlier OS applications, this file would normally be saved in PDF Format.
1. Pressing Command-Shift-3 to capture a screen shot
This command is one of the simplest ways of getting to capture the screen shot of the desktop. Using this command will be able to save a screen shot as a PNG File. This command allows the user to capture the image of the whole desktop. It also saves the file automatically as a PNG file and there is no need to choose the file type prior to saving the image. The saved file will also be available on the desktop and can be viewed and manipulated for file location transfer afterward.
Leave a Reply