Gone were the days when people could still settle for getting low-quality content especially when it comes to movies and series. If you are a MAC user, this is also the kind of content you want to avoid. You already know that your computer is competitive enough, so wouldn’t it be better to combine it with equally competitive accessories for the best and most competitive viewing experience? This is where Rip Blu-Ray MAC comes in. This kind of accessory makes it possible for you to rip and burn top-quality contents on your computer and here’s how.
10. The Truth about MAC and Blu-Ray
Before anything else, you need to know one thing first. MAC does not support Blu-Ray accessories so it isn’t possible for you to convert such content by simply using your computer. What you can do instead is search for some reliable attachments that will make this possible. The question is, do you think it’s really for you? If yes, then all you need now is to find the best and most competitive external Blu-Ray drive out there.
9. Is it Advisable to Buy an External Drive?

If you really want to convert different types of content in rip Blu-Ray format then getting your own external drive is the best option that you have. This one is great because there are a lot of options available for you and it can be classified into two categories that we will get to later but all external drives for this purpose shouldn’t be that expensive. If you are on a budget, you can get one for a small amount of $60 and you can already get good quality content.
8. Different Types of External Blu-Ray
In relation to what has been mentioned earlier, there are several different types of external drives when getting a rib Blu-Ray for MAC. That is to say, if your budget is tight, you can simply go for one that is not that expensive. On the other hand, if your budget is not necessarily an issue then you can get something that is a little bit more expensive. Of course, getting one from the other has its own set of benefits and downsides. The cheaper one will provide you with limited options while the more expensive one will provide you with better quality content. Choose the one that you will get based on what your actual purpose is in the first place.
7. Some Tools You Need
After you’ve made up your mind on the kind of drive you will be getting, it’s now time to look into the tools you are also required to purchase. For MAC users like you, only one option is available and that is to get a shareware that you can use for free for 30 days but after the free trial, you would be required to purchase it for only $50 and then you can use it endlessly. What this shareware does is it allows you to rip your Blu-Ray content. Another tool you might need is none other than this, you might also need to download Handbrake if you still don’t have it because it’s also very useful for this type of content.
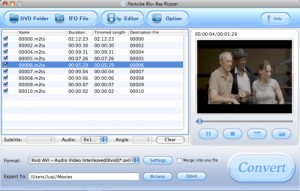
6. The Transfer Process
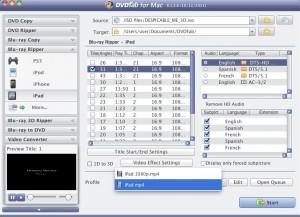
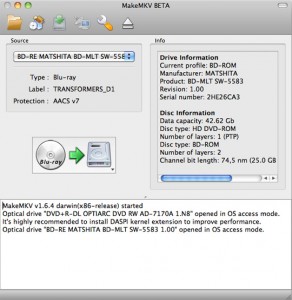
Once your tools are already complete, it’s now time for you to start your transfer process. The process is actually pretty easy because all you have to do is follow these steps. First is to insert your Blu-Ray disc into the external drive and wait until your MAC detects it. After this, click the big button in green and start scanning the content. After this, select on the size and file type you want for your files as well as the language you want for the content. Once done, start the transfer process and in just a minute or two, you’re all set.
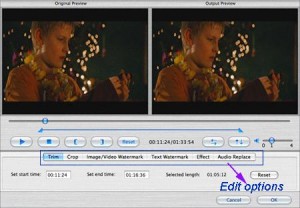
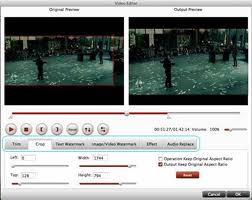
5. Video Conversion
The next thing you need to familiarize yourself with is how to convert various types of content. Some files might not be supported by MAC so you need to watch out for those. Make sure to convert your document by looking into the options that you have. Conversion shouldn’t take too long too as long as you’re doing it one by one.
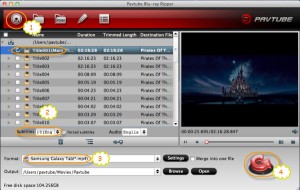
4. Meta Data Import
If you wish to watch your videos on your MAC, which is of course the main purpose for getting an external drive in the first place, make sure to import the documents and its data to iTunes. This way, iTunes will be able to take note of the title of the video and other information it might need to register a specific movie file.
3. Quality Content

Once done, it’s now time to check whether or not the quality of the content you just ripped is actually competitive enough for the standards of your MAC as well as your standards. If it is, then you’ve done yourself a very huge favor and if it isn’t, it can be because you missed out on one process or something like that.
2. Is it Right For You?
You also need to know whether or not getting through all this trouble for getting a video content ripped on MAC is worth it when there are a lot of other websites out there that you can just check and register for and just like that you will be able to watch endless video contents. The answer to this should differ based on your needs so this is also something you need to consider and weigh.
1. Other Options Available
If you end up deciding that a rip Blu-Ray is not a priority, don’t worry because you can either watch video contents online or you can use other computers if you want to rip and save some video contents to your old computer or hard drive. Whatever it is you end up choosing shouldn’t be that big of a deal as long as you’re able to keep yourself entertained.
May 31, 2013 8:42 am
I think it is better to use a Blu-ray burning tool for mac to do the job, and that is the really method that can be without sweat.For the tools, I recommend the tool from CNET.
http://download.cnet.com/Leawo-Blu-ray-Creator/3000-18554_4-13039201.html?tag=bc
July 8, 2013 2:21 am
There are ways to do this, here’s one.
http://www.ilikemall.com/bluray/rip-blu-ray-to-mkv-mac.html
July 12, 2013 7:18 am
I’ve been experimenting with this topic for quite some time and I’m finally happy with how it’s been working! Here’s my process for ripping BluRays with a Mac: http://youtu.be/v2YsSe6lNZQ
Cheers!
September 27, 2013 1:37 am
It’s really detailed, I used this blue-ray ripper: http://kwitsoft.com/blu-ray-dvd-ripper-mac.html I think it’s not bad too.